
Installing the Reqme WordPress Plugin #
The Reqme WordPress plugin allows you to seamlessly integrate service request functionality directly into your WordPress website. This guide walks you through the installation process, configuration options, and troubleshooting common issues.
Before You Begin #
Before installing the Reqme WordPress plugin, please ensure:
- WordPress 6.0 or later. The plugin will not activate on older versions.
- PHP 7.4 or later. Your host can tell you which version you are on if you are unsure.
- An active ReqMe account, so you have something to connect the site to.
- Administrator access to the WordPress site.
Installation Methods #
There are two ways to install the Reqme WordPress plugin:
Method 1: Install from WordPress Plugin Directory #
- 1. Log in to your WordPress admin dashboard
- 2. Navigate to Plugins > Add New
- 3. In the search field, type “Reqme”
- 4. Look for the Reqme plugin with our logo
- 5. Click Install Now
- 6. After installation completes, click Activate
Method 2: Manual Installation (ZIP file) #
- 1. Go to wordpress.org/plugins/reqme
- 2. Press Download to get the plugin ZIP
- 3. Log in to your WordPress admin dashboard
- 4. Navigate to Plugins > Add New
- 5. Click the Upload Plugin button at the top of the page
- 6. Click Choose File and select the downloaded ZIP file
- 7. Click Install Now
- 8. After installation completes, click Activate
Connecting Your WordPress Site to Reqme #
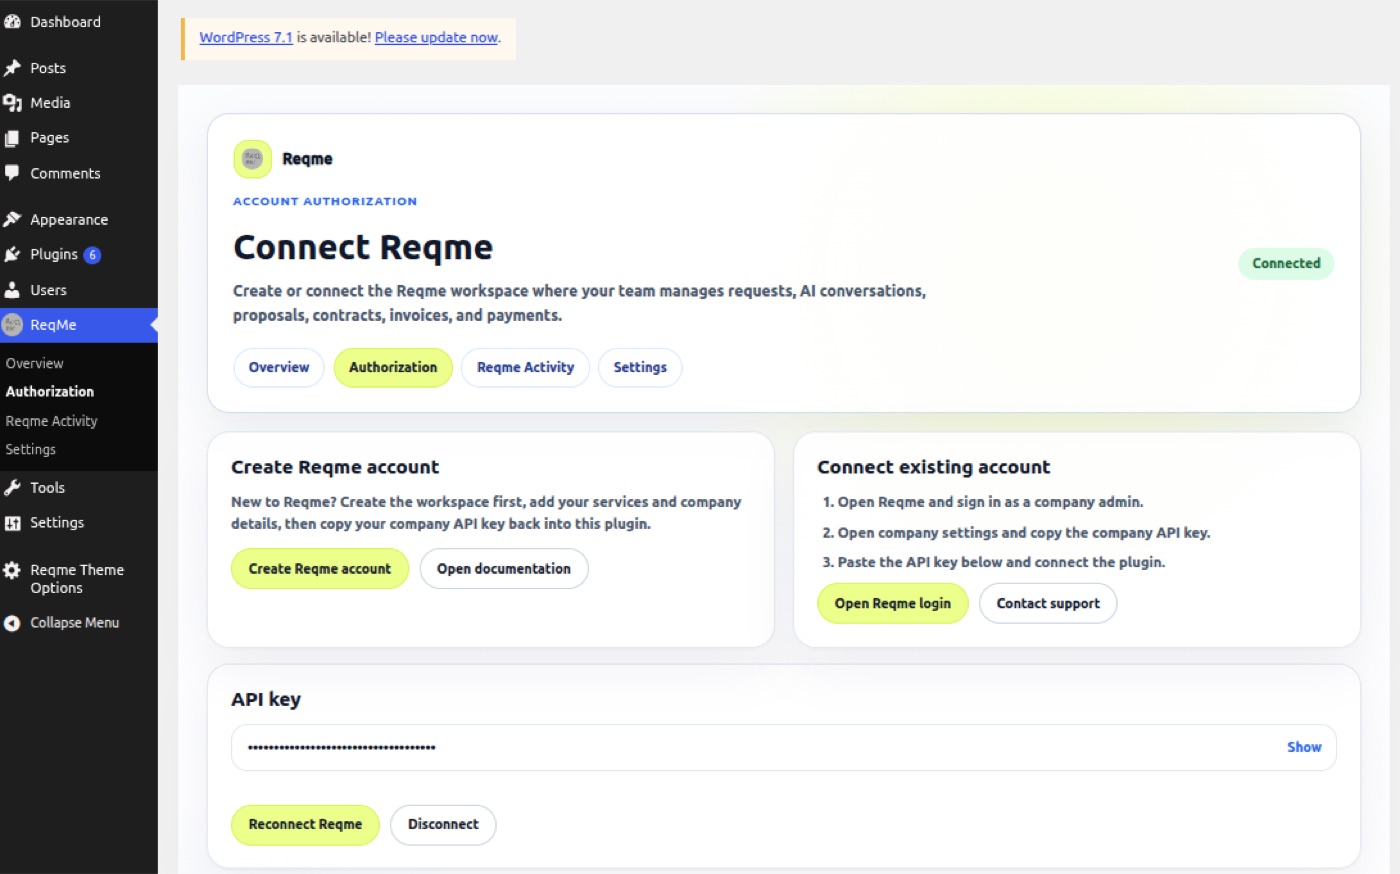
After activating the plugin, you’ll need to connect it to your Reqme account:
- 1. In your WordPress admin, navigate to the new Reqme menu item in the sidebar
- 2. Click on Authorization
- 3. You’ll be prompted to enter your Reqme API key
- 4. To get your API key:
- a. Log in to your Reqme account
- b. Navigate to Company > API Key
- c. Copy your API key
- 5. Paste the API key into the field in your WordPress Reqme settings
- 6. Click Connect
- 7. If successful, you’ll see a “Connected Successfully” message
Connecting your WordPress site to your Reqme account
Plugin Configuration #
Choosing how the chat appears #
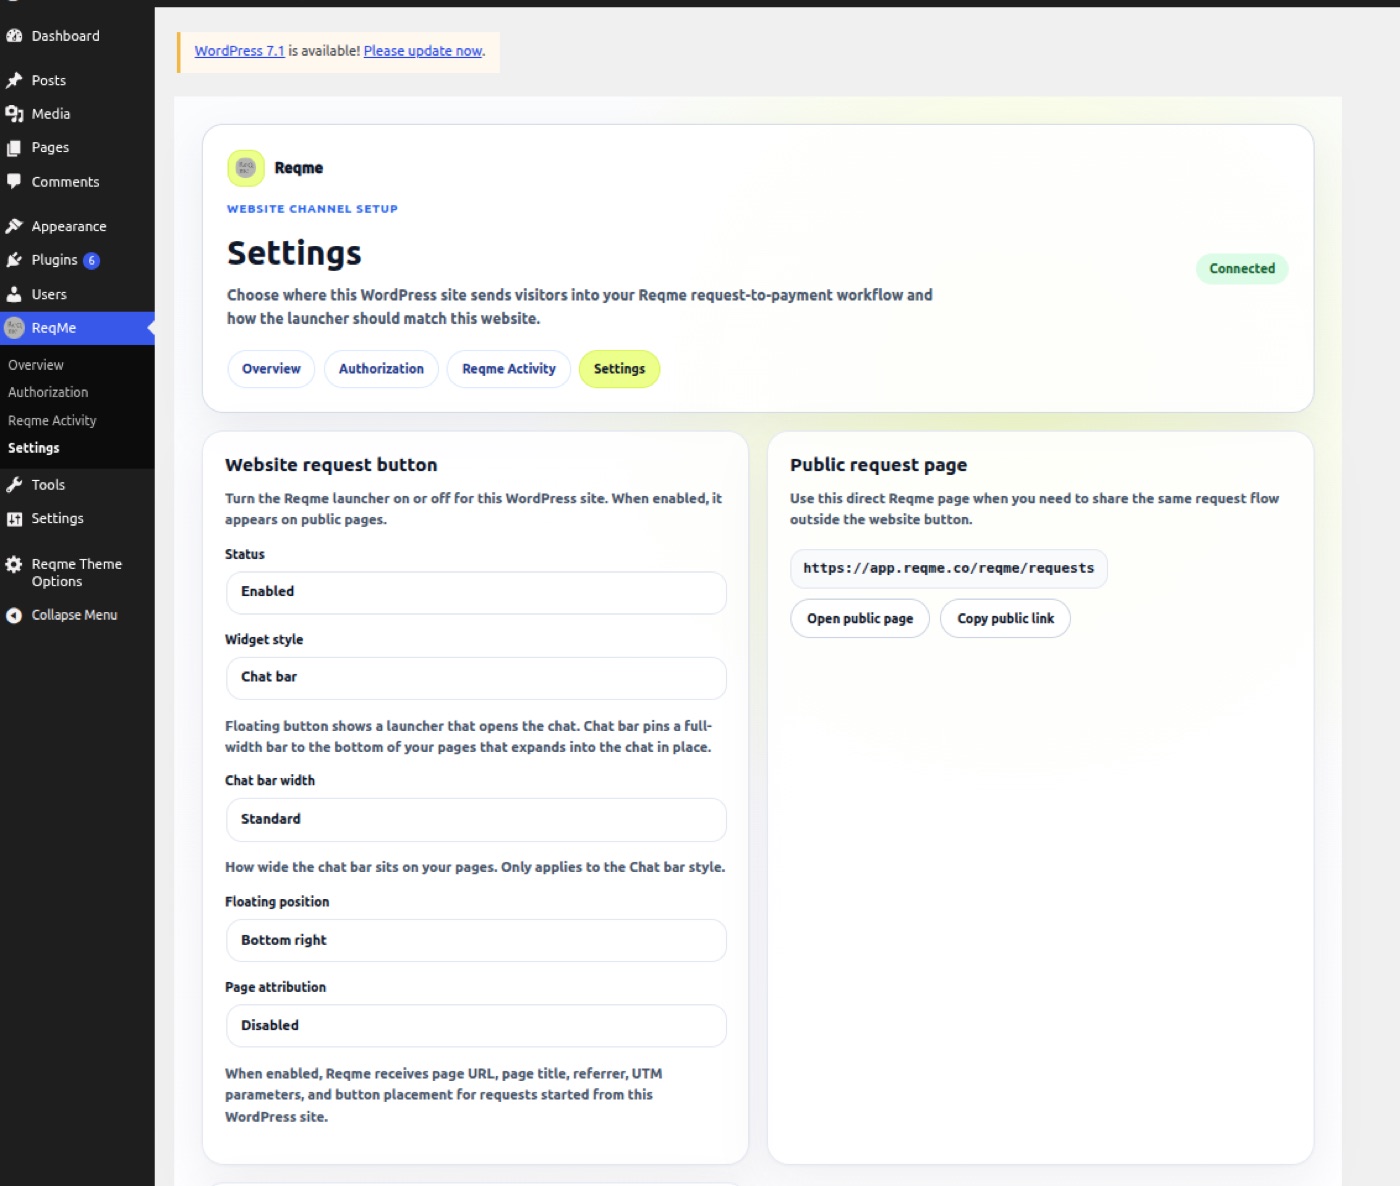
The plugin offers two styles, and the choice matters more than it looks.
- Button — a familiar bubble in the corner. Unobtrusive, and what most visitors expect.
- Chat bar — a bar along the bottom of the page, with a visible prompt inviting a question. Harder to ignore, and it gets used more.
The chat bar has three widths — standard, wide and full width — so it can sit comfortably with your site’s layout rather than fighting it.
If your site already has something anchored to the bottom of the screen, a cookie notice or a sticky bar of your own, choose the button. Two bars stacked is worse than either alone.
What else is on the Settings tab #
Two options are easy to miss and worth a deliberate decision:
- Floating position — bottom-left or bottom-right, for when the corner you would normally use is already taken.
- Page attribution — off by default. Turn it on and requests started from your site also carry the page URL, page title, referrer, and any UTM parameters. That tells you which page produced the enquiry; it also means more data leaves your site, so switch it on because you will use it, not by reflex.
The Reqme Activity tab shows what the plugin has been doing, which is the first place to look if requests are not arriving.
Once connected, you can configure how the Reqme plugin works on your website:
General Settings #
- 1. Navigate to Reqme > Settings in your WordPress admin
- 2. Configure the following options:
- a. Enabled: turn the widget on or off across your site
- b. Button Style and Positioning: Select Pop Up logo and positioning which you prefer
- c. Launcher: choose the logo on the launcher, and whether it pulses to draw attention
- 3. Click Save Changes
Widget Settings
Button Style
Testing Your Installation #
After setting up the plugin, it’s important to test that everything is working correctly:
- 1. Visit your website as a regular visitor
- 2. Click on the Reqme request button or navigate to a page with an embedded form
- 3. Fill out and submit a test request
- 4. Check your Reqme dashboard to confirm the request was received
- 5. Test any automated responses or notifications
Troubleshooting Common Issues #
Plugin Not Connecting to Reqme Account #
If you’re having trouble connecting the plugin to your Reqme account:
- 1. Verify that you’ve copied the correct API key
- 2. Check that your WordPress site can make outbound connections
- 3. Ensure your Reqme account is active and not suspended
- 4. In case nothing helped please reach us out on hi@reqme.co
Form Not Displaying #
If the request form isn’t appearing on your website:
- 1. Check if there are any JavaScript errors in your browser console
- 2. Verify that your theme is compatible (try switching to a default WordPress theme temporarily)
- 3. Disable other plugins to check for conflicts
- 4. Clear your caching plugin and any CDN cache, then reload the page.
Request Not Being Received #
If request submissions aren’t showing up in your Reqme dashboard:
- 1. Check your WordPress site’s connection status in Reqme > Settings
- 2. Verify that your internet connection is stable
- 3. Check if there are any firewall settings blocking the communication
- 4. Ensure your Reqme account has available request capacity
Next Steps #
Now that you’ve installed and configured the Reqme WordPress plugin, you might want to explore:
Need help? #
If this page did not answer your question, send it to us. Tell us what you were trying to do and what happened instead — that is usually enough for us to spot the problem straight away.
Prefer email? hi@reqme.co


